How to Reverse A Video in CapCut
Last UpdatedMay 28, 2024
by
Anthony Gallo

Overall CapCut is an intuitive video editing app where most things can be figured out pretty quickly.
Reversing videos in both the CapCut app and PC version is simple!
In this guide, I'll show you exactly how to reverse a video in CapCut on both the mobile and desktop versions.
How to Reverse a Video in the CapCut Mobile App
Reversing videos in the CapCut app takes a few seconds. Here's how!
- Open the CapCut app, start a new project or edit an existing one.
- Tap the clip you want to reverse.
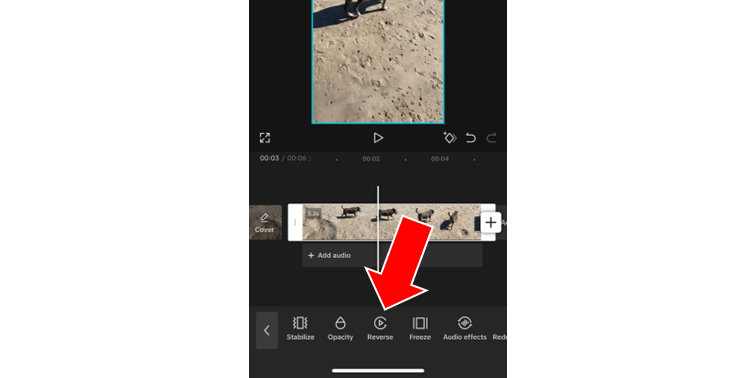
- Scroll along the menu at the bottom of the screen until you see the "Reverse" option (it's near the end).

- Tap "Reverse"
- If you don't want the audio of you clip to be reversed, using the same method as above scroll until you see "Extract audio".
That's it!
How to Reverse a Video in CapCut Desktop Version
To reverse video clips in the CapCut desktop app, follow these simple steps:
- Open CapCut, start a new project or edit an existing one.
- Click the video clip you want to reverse
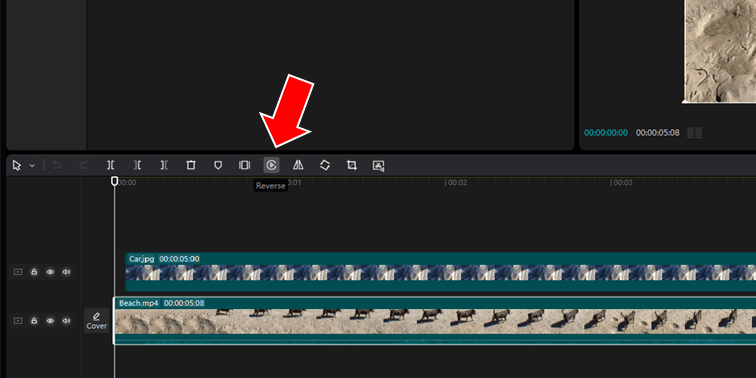
- Click the "reverse" button in the menu above the video editing timeline.

- Remember to extract audio first if you don't want it to be reversed with the video. To do this, right clip the video clip and click "Extract audio".
Simple!
Reversing Videos in CapCut: Troubleshooting
While CapCut is pretty reliable, sometimes these extra features don't work.
Here's some things to try if the reverse feature isn't working in CapCut:
- Restart CapCut: Sometimes, simply restarting the app can resolve minor glitches. Close CapCut and reopen it to see if the reverse function works properly.
- Re-import the Clip: If the reverse option isn't working on a particular clip, try removing the clip from the project and re-importing it.
- Clear Cache: Clearing the app's cache can resolve various issues. Go to your device's settings, find CapCut, and clear the cache.
- Reinstall CapCut: If problems persist, uninstalling and reinstalling CapCut can often fix persistent issues by resetting the app to its default state.
- Check for Updates: Regularly check for software updates for both CapCut and your device's operating system. Updates often include bug fixes and performance improvements.
- Consult CapCut Support: If none of the above solutions work, contact CapCut support for assistance. They can provide specific troubleshooting steps based on your issue.
These steps should help resolve common issues with reversing videos in CapCut.
How to Add A Forward/Reverse Effect in CapCut
A forward/reverse effect in CapCut is a simple and popular way video editing gurus are using the reverse effect in CapCut.
Here's how to add a simple forward/reverse effect in CapCut
- Find the part of the video clip you want to add the effect to and click on the 'split' option to divide the clip at the start and ending of the section.
- After splitting the clip, the next step is to select the split part and make two copies of it, resulting in three clips.
- Select the middle clip and apply the reverse effect, which might take some time to process.
- Your reverse effect is ready now you can export your video!
Try adding a reverse effect to CapCut overlays to level up your content ever further!
What Can the Reverse Effect be Used for in CapCut?
The reverse effect in CapCut can be used for various creative and practical purposes.
Here's some key uses:
- Creating Unique Visuals: The reverse effect can make ordinary footage look extraordinary. For example, a video of someone jumping into a pool can be reversed to show them seemingly jumping out of the water.
- Enhancing Storytelling: Reversing a video clip can add a unique twist to your narrative. It can be used to reveal events in a non-linear fashion, making your story more engaging and intriguing.
- Special Effects and Transitions: The reverse effect can be used as a transition between scenes. For instance, you can reverse the end of one clip to smoothly transition into the start of another clip, creating a seamless and visually appealing effect.
- Highlighting Specific Actions: By reversing a specific action within a video, you can draw attention to it. This is particularly useful in tutorials or instructional videos where showing the reverse action can help clarify complex steps.
- Creating Fun and Surprising Content: The reverse effect can be used for comedic purposes or to create surprising and amusing videos. For example, you can reverse a clip of something breaking to show it magically coming back together.
- Music Videos and Artistic Projects: In music videos or other artistic projects, reversing footage can add an artistic flair. It can be used to match the beat of the music or create visually stunning sequences that captivate the audience.
- Social Media Content: For platforms like TikTok, Instagram, and YouTube, where engaging content is key, the reverse effect can make your videos stand out. It’s a simple yet effective way to catch viewers' attention and make your content more shareable.
By utilizing the reverse effect in these ways, you can enhance the creativity, engagement, and overall impact of your video projects in CapCut.
Wrapping Up
Today I gave a short and sweet outline of how to reverse a video in CapCut.
The reverse effect can be used for a range of different effect and is worth adding to your tool bag of CapCut editing tricks.
Happy Editing! 😎

Anthony Gallo
Anthony Gallo is the cofounder of ContentCreator.com and lead educator in the online course 14 Day Filmmaker, that has taught over 100,000 aspiring creators how to shoot & edit professional video content with PRO and SMARTPHONE cameras.
Having created content in a variety of industries including commercial advertising, weddings, music videos, and hundreds of youtube videos, Anthony has amassed over 50 million views online and is constantly looking for new and engaging ways to create content and help others master this amazing craft.